IntroductionThis section provides the different methods of lighting and shadows used in Train Simulator. This section also covers the specific authoring guidelines for stencil shadows.
It is assumed that the 3D modelling package used is Autodesk® 3ds Max® and the package used for authoring textures is Adobe® Photoshop.
The modelling package Autodesk® 3ds Max® was used to create Train Simulator, so this product appears in the examples provided. You can, of course, use other packages such as Blender™ or amabilis 3D Crafter. The package used here for authoring textures is Adobe® Photoshop. Again, you may use one of the many other packages available.
Regardless of the packages you use, the documents below should be used as a general guide to the processes to follow to build assets for Train Simulator.
| Important Note: For your chosen package, you may need additional plug-ins to export the assets into Train Simulator. Please check the availability of a suitable plug-in before you begin creating assets. |
Lighting & ShadowsBuildingsThe buildings can be pre-lit using pre-shaded shadow-map as a secondary texture pass. This process will give the buildings a basic lighting pass before the additional effect of the in-game dynamic lighting.
It is important to remember to pre-light the building without any signs of an obvious overwhelming lighting direction. The game will feature a dynamic time of day so any pre-lit direction in the shadow-map will look incorrect. The building should be pre-lit with a diffused lighting model, possibly only picking out shadowy areas under overhangs, and in concave parts of the architecture (e.g. on internal corners between walls).
Some buildings will have extra ‘illumination’ polygons placed over certain windows, which will only be renderable at night. See Asset Authoring Guidelines for more information. TreesTrees and shrubs will have a generic ‘blobby’ shadow automatically placed underneath at the ground level. This shadow will help to anchor the foliage to the terrain.
| Note: This is an option which is enabled through the asset blueprint. |
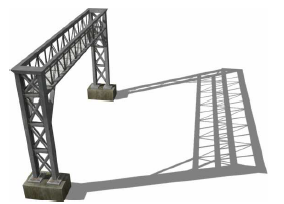
Stencil ShadowsGeometrySome scenery objects need stencil shadows.
Examples: - Rail vehicles (Locos, carriages, 3D cabs, wagons, tenders etc)
- Objects that are placed over the track (gantries, footbridges)
- Buildings (most buildings will use stencil shadows)
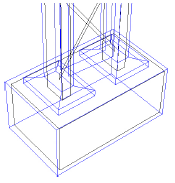
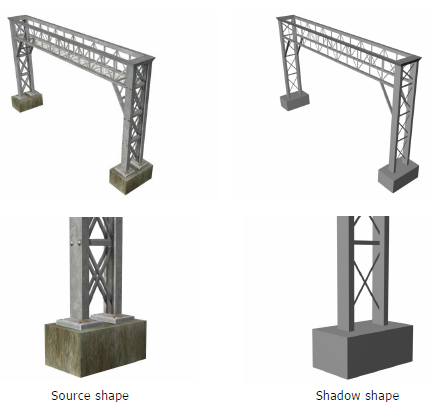
Stencil shadow shapes are low-resolution geometry shapes that exist as an object (or objects) in the same max file (and IGS file) as the source shape. The effect is below: NameEach shadow shape must be a called A_BBBB_shadow_XXXXXX where: - A - represents the LOD number
- BBBB - represents the LOD distance
- XXXXXX - represents a logical name
For example: 2_0400_shadow_gantry, 1_0750_shadow_car Construction- The shadow volume must be completely contained within the volume of the source object. In the example pictured right, the blue wireframe represents the source shape, and the black wireframe represents the shadow volume.
- All elements contained in the shadow volume must be made as a closed shape, i.e. each element must be a continuous surface with no open edges.
- The shadow volume can be made from multiple elements.
| Note: As part of the export process, the shape goes through a vertex welding stage where vertices within a threshold are welded together. If the shadow volume doesn’t render correctly, it’s recommended that you check to see if any vertices are too close and are possibly being automatically welded together. |
MaterialThe shadow material must be called shadow_XXXXXX where XXXXX represents a logical name e.g. shadow_gantry
The shader StencilShadow.fx must be used. A texture from the source shape can be referenced in the texture slot. Punch Through DetailAreas of punch-through transparency must be created through the use of polygons as the stencil technique doesn’t have texture support.
MappingThe shadow stencil shape must be mapped with UVs. Only generic UVs need to be present, so a simple planar map over the entire object will suffice. Hierarchy / AnimationThere is no requirement to have the shape linked in a hierarchy other than where animation is involved. If the source shape is static (no animation) then all elements of the shadow volume should be contained within a single object and doesn't necessarily need to be linked to the source shape. If there is animation on the shape then it is recommended that the individual shadow volumes for the moving nodes be linked to the corresponding animated nodes in the source shape. This way, as the source shape nodes animate, the shadow volumes for those nodes will also animate. Smoothing GroupsThe shape must have correct smoothing groups assigned with angular hard edges where necessary.
|
|