Terrain Painting ToolsThe Painting Tools in the Terrain Toolbox allow you to alter the appearance of the terrain. Height ToolRaises or lowers areas of terrain. Select the tool, hold the left mouse button over a point on the terrain and drag the cursor up and down. Increase Height ToolIncrementally increases the height of an area of terrain. Select the tool, click and hold the left mouse button and move the cursor over the area of terrain you want to raise. Decrease Height ToolIncrementally decreases the height of an area of terrain. Select the tool, click and hold the left mouse button and move the cursor over the area of terrain you want to lower. Smooth ToolSmooths the edges of terrain. Select the tool, click and hold the left mouse button and move the cursor over the area of terrain you want to smooth down. Level ToolLevels off the terrain. Select the tool, click and hold the left mouse button over the area of terrain you want to level off. Noise ToolCreates undulations in the terrain. Select the tool, click and hold the left mouse button and move the cursor over the area of terrain where you want to create undulations. Snap ToolSnaps the terrain to linear objects. Select the tool, click and hold the left mouse button and move the cursor over a linear object to snap the terrain to that object. Paint Terrain ToolPaints the terrain with different textures. Select the tool, select a texture from the browser list then click and hold the left mouse button and move the cursor over the area of terrain you want to paint. Terrain Grid SystemTerrain editing is performed in the World Editor by clicking the Painting Tools icon on the top left which resembles a paintbrush. The terrain system in Train Simulator uses a grid of approximately 8x8 metres. Every 8 metres is a point where the terrain can be raised or lowered. Using the Height tool with the brush size set to ‘10’, you can grab a single point on the terrain and drag it up and down. Snap Terrain to Track ToolThe Snap Tool is used to deform the terrain so it snaps to the height of the track, or any other linear object within the tool’s radius. The Snap tool is accessed from the Toolbox tab, having first selected Linear Tools. The Snap tool has several settings which you can adjust. 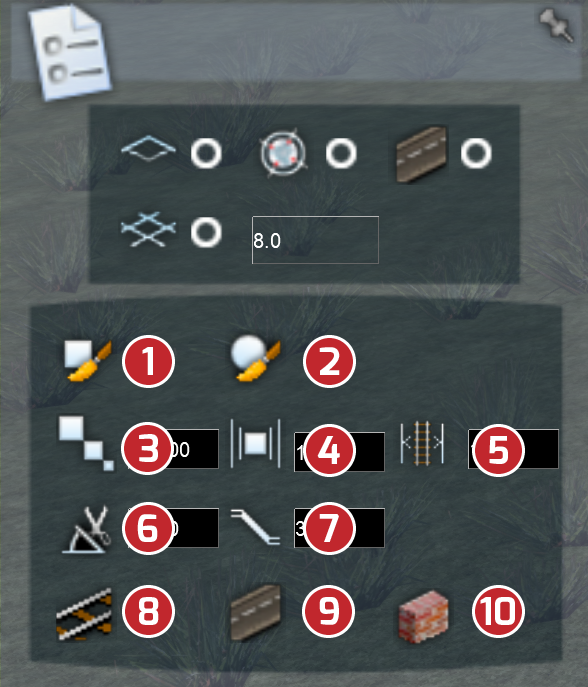
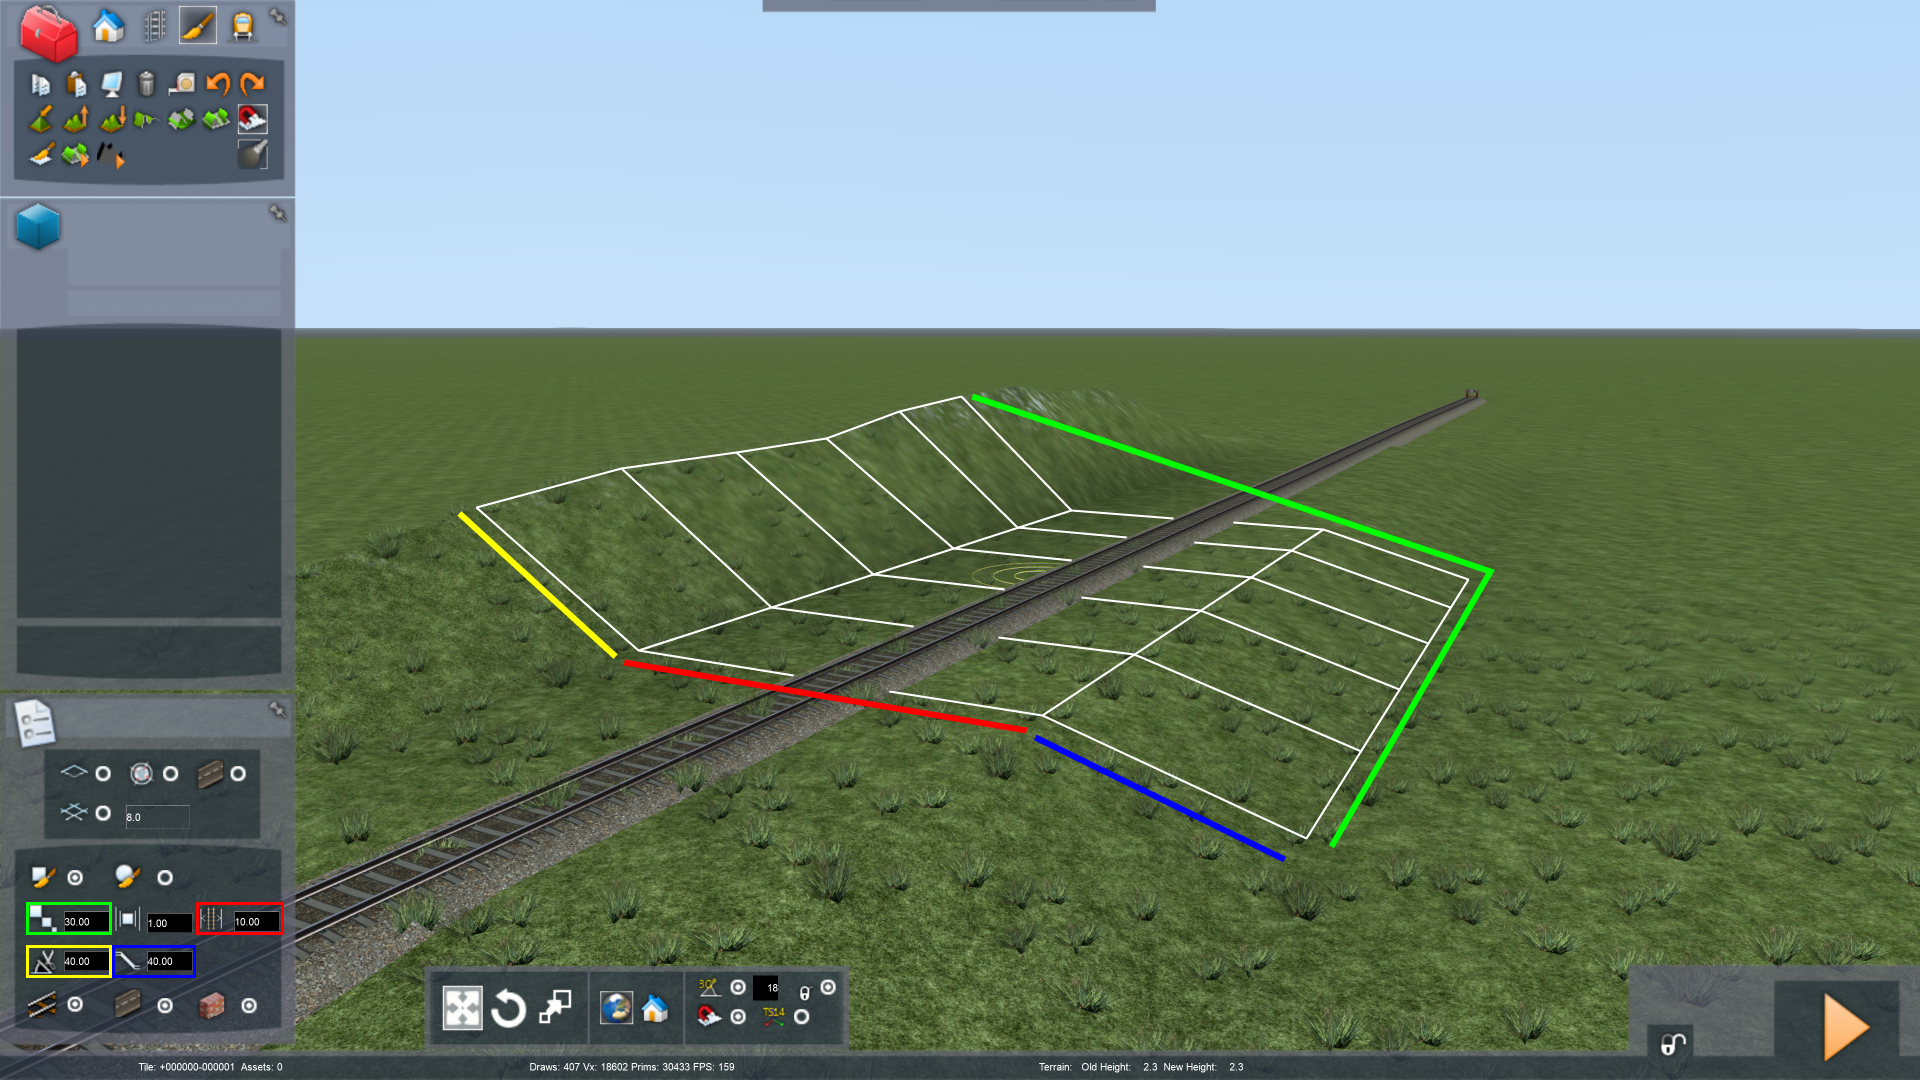 The image above shows where the base width (the "flat area" (red) before the cutting (yellow) and embankment (blue) values are applied). The cutting angle (affecting any terrain above track height), embankment angle (affecting any value below track height takes effect) is applied depending on the value entered in those fields. The brush size is simply the size of the area affected by the settings (green). In the context of cuttings and embankments, brush falloff has little effect (you will notice the effect of falloff when raising or lowering large areas with a large brush size). Similarly, the choice of a square or round brush is largely irrelevant. Fine Editing TerrainThe Snap Tool described above is the main choice when creating cuttings and embankments but there will almost always be a need to make minor adjustments after the terrain has been modelled to get better results, especially when jagged, saw-toothed edges are inadvertently created. The Height Tool is the best and most accurate tool for fixing such areas. It allows you to raise and lower terrain by moving the mouse up and down. For especially fine results, set the brush size to 10. Left-click and hold a point on the terrain and move the mouse to raise or lower the jagged edges of the terrain to create a smooth embankment. After tweaking with the Height Tool size set to 10, the embankment is smooth and there are no jagged edges. Extracting New Terrain TilesTo allow you to create representative landscapes, Train Simulator provides the ability to import publicly available height data. The facility is only available when the object or linear object toolboxes are open and it allows you to insert an area of SRTM (Shuttle Radar Topography Mission) data. To automatically create nine tiles of real-world terrain data underneath the camera’s current location, press T. When using this tool, you may find the camera is underground after the terrain extraction is complete. You can obtain SRTM data from http://dds.cr.usgs.gov/srtm/version2_1/SRTM3/ and http://www.viewfinderpanoramas.org/Coverage%20map%20viewfinderpanoramas_org3.htm in the form of .hgt files. Place the .hgt files into the DEM\SRTM folder in Train Simulator's root folder (by default this is C:\Program Files (x86)\Steam\steamapps\common\railworks\). You will need to create this folder if it is not already present. Common Terrain ExamplesCuttings & EmbankmentsAlthough there is no “correct way” of creating an embankment or cutting, the following sections are intended to provide appropriate settings for creating typical examples. These settings can be used as a basis and adjusted until you get the result that best suits you. A Gentle Cutting & EmbankmentTo create a gentle trackside embankment or cutting, the following settings were used for the Snap Tool:
Single point terrain tweaking was then done using the Height Tool with a brush size of 10.
A Steep Cutting & EmbankmentSteeper trackside embankments or cuttings use the following settings for the Snap Tool:
Single point terrain tweaking was then done using the Height Tool with a brush size of 10.
Overpasses & UnderpassesOverpasses and underpasses use much of the technique described in Cuttings & Embankments, but there are other factors to bear in mind:
Creating a Typical OverpassThe following workflow steps outline one method of creating an overpass. 1. Place the bridge Before any terrain is jiggled with, it is helpful to know the height to which you must move it to. There are several bridge assets in the game that will have clearance heights to suit your needs. Pick a bridge that you know has clearance room for your train to pass under and place it over the track. Make sure the bridge is not sunk or floating. 2. Place a suitable loft over the bridge shape Most overpasses are for roads or track. For the purposes of this example, we'll use a road to go over the bridge. Place a straight section of a road linear object and move it so that it sits on top of the bridge shape. 3. Use the snap tool on the road ends Once the linear object (in this case, a road) is in position over the bridge you can use the Snap Tool and sweep it over the ends, working towards the middle. Typical settings for the Snap Tool for this function are:
Entering drive mode will render the terrain and produce the correct lighting and shading for your new terrain. 4. Tweak the terrain with a small brush Although much of the terrain around the overpass is correct there may well be terrain points overlapping the track, or gaps under the road. Most of this can be fixed using the Height Tool with a brush size set to 10. You can pull individual terrain points up and down until you get a result you are happy with. 5. Extend linear objects and use gradient points to angle them Now that the terrain has been manipulated around the bridge, you can extend the road as far as you want. Insert gradient points and pull them up and down if you want a sloping road. As long as you do not sweep the Snap Tool too close to the terrain you have already deformed you can use the Snap Tool on the new parts of the road. 1. Place a bridge asset to determine clearance under track Again, use a bridge asset that will have clearance height to suit your needs. Make sure the bridge is sunken so that the track is running over the top of the bridge. 2. Place a suitable loft under the bridge shape Underpasses can be used for different purposes such as for roads, track, pedestrians or rivers. Each of these underpass types would require different clearance heights under the bridge. For the purposes of this example, we'll use a road to pass under the bridge. Place a straight section of a road linear object and move it so that it sits under the bridge shape. Even if the end result does not require a linear object to be in the game, it is useful in the creation of the terrain and can be deleted at the end. 3. Use the snap tool on the road ends Once the linear object has been placed under the bridge at the correct height, you can use the Snap Tool and sweep it over the ends, working towards the middle. Typical settings for the Snap Tool for this function are:
4. Tweak the terrain with a small brush Now, most of the terrain will be deformed but there will be terrain points overlapping the road or jagged points which need smoothing out. Most of this can be fixed using the Height Tool with a brush size set to 10. You can pull individual terrain points up and down until you get a result you are happy with. 5. Extend linear objects and use gradient points to angle them Now that the terrain has been manipulated around the road you can extend the road further. Insert gradient points and pull them up and down if you want a sloping road. As long you do not sweep the Snap Tool too close to the terrain you have already deformed you can use the Snap Tool on the new parts of the road. Additional objects can be placed to cover up any areas where terrain manipulation failed. Tunnel MouthsThis section will describe the steps needed to create a good looking tunnel mouth and presumes that track laying is complete together with the correct tunnel track profile. If a non-tunnel type track profile is laid then the camera will not automatically switch to cab view and the dark tunnel walls will not be present. Creating a Typical Tunnel EntranceYou may have terrain extracted from satellite data or you may have manually created your terrain. The track has been laid to the correct gradient and inside the hill, the track has a tunnel type profile. 1. Snap the terrain to the track until you see the tunnel Using the technique described in Cuttings & Embankments to create a cutting you can run the Snap Tool along the track until you see the start of the tunnel track.
This creates a steep edge in the terrain around the start of the tunnel. Enough of the tunnel track type is exposed so that you can see it for lining up the tunnel mouth shape, but not too much is exposed as this will create a gap behind the tunnel mouth shape when it is placed. Some fine terrain tweaking may be needed at this point. Make the Height Tool brush size 10 and raise and lower points as needed. 2. Place the tunnel mouth shape There is a selection of tunnel mouth shapes that can be used. Navigate to the shape in Object Tools and select the Bridge / Viaduct / Tunnel filter in the middle left tab and either scroll down the list until you see the tunnel assets grouped together or select any object in the list and press T to jump to the objects beginning with the letter T. Place the tunnel mouth shape so that it lines up with the start of the tunnel track type. Make sure it is rotated correctly and check what it looks like both from outside and inside the tunnel. You can fine-rotate the object by selecting it and pressing F or G. 3. Place the Tunnel Hole Decal Now that the terrain and main shape for the tunnel is in place you can place a texture over the tunnel mouth that will act as a blank space when in drive mode. It is like a cartoon comedy hole that when placed on the terrain cuts through it. This is called a Tunnel Hole Decal. Decals are flat textures which cover the shape of the terrain. They can be resized with the corner and side handles as well as rotated. Once the decal is placed on the tunnel it will be difficult, though not impossible, to select again because the selection of the track or tunnel mouth is in close proximity. Place the decal on the ground near the tunnel and approximately resize it to the size of the inside of the tunnel shape and at a suitable orientation. When satisfied, select it and drag it over the tunnel mouth. In editor mode it will look like a black texture but when in drive mode it will become transparent. 4. Remove procedural flora over the tunnel hole If a texture is near the tunnel mouth which has procedural flora attached then you may get flora which appears to be floating in mid-air. To avoid this, select a grass without flora texture from within the painting tools section. Paint the immediate area with this texture until flora in the hole disappears. If some persists then you will need to paint a little further out. 5. Dress the tunnel mouth With the major steps complete you can add the finishing touches to the tunnel area. Once you have a good looking tunnel mouth with the decal in place you should leave those few terrain points alone or you may affect how it sits on the terrain. Editing terrain a few points away from the tunnel is fine. Minor errors such as any points where the tunnel track texture can be seen behind the tunnel shape can be mostly hidden with foliage or other shapes. |
Reference Manual > World Editor >